by Mike Miller
The 13th Princess Process Overview
There were quite a few steps involved in creating The 13th Princess. Here is a brief overview of some of the main components –
The Book –
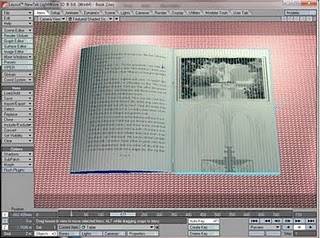
The book and the surrounding environment were all created in Lightwave 3D. I scanned in actual pages from the book and mapped them onto the 3D pages. I made the pages in such a way that they would bend as I folded them back.
The images in the book were created after I completed all of the shots in the video. I took the first and last frame of each shot and made them gray scale in Photoshop and comped them onto the image I used for that particular page in Lightwave. When I rendered the full animation of the book, I set envelopes that would swap the first image of the sequence for the last image of the sequence once the camera was zoomed in on the graphic. So, in other words, the camera would zoom in on the first image of the sequence, hold for a few frames, the image would swap to the last frame of the sequence, the camera would hold a few more frames then pull back for the page to turn. After page turned we were on to our next sequence. I rendered all of this out as a single sequence and then cut it up and inserted the live video sequences in Adobe Premiere.
The “magic” during the page turn was added in After Effects using Trapcode’s Particular. I hand-tracked the emitter to the corner of each page as it flipped. If I would have been smart and pulled back my 3D camera a bit more, I may have been able to use the Motion Tracker in After Effects and saved myself some time. As it was, the corner of the pages went out of frame so I had to hand track it.

Image 1 – Wire frame of the book and table

Image 2 – Book in “Preview Mode”

Image 3 – Perspective view
The Sequences –
The Castle was created from pieces of imagery on the book cover. I had to create some pieces that were missing. I cut everything up and put each item on its own layer.
The butterflies were from the cover. I cut them out in Photoshop and animated them in After Effects.
The birds in the far background were created in After Effects by animating masks on solids.
One effect kind of got lost – there is a subtle ripple on the water below the castle.
I layered the imagery in 3D space in After Effects then did a slow camera push through the layers.
The Kitchen was all modeled in Lightwave. I mapped some video footage of a fire onto a polygon and placed it under the cauldron. I animated lights in Lightwave to flicker along with the fire to simulate an interaction between the firelight and the room. I rendered the table in a separate pass so I could place it in front of the actress.
The actress was shot on a greenscreen and motion-tracked into the shot in After Effects. I used the After Effects Cartoon Filter to blend her into the shot.

Image 4 – Kitchen Model
The Window/Moon shot turned out to be more work that I anticipated. I added markers to the greenscreen and did a dolly push up to the actress. Unfortunately, the shot had a lot of subtle bounces as the wheels rolled over the dolly tracks. I think I accidentally turned off the stabilizer on my video camera, but I did not notice it until the actress was long gone. I had to do some major motion-stabilization to the shot before I did my 3D track because every tiny bounce translated to my 3D camera in Lightwave and the shot looked awful! There was also an entire sequence cut out where the actress looks at one of her sisters worn-out shoes. I had scuffed up/dirtied up the shoe to the point that the actress didn’t really want to touch it, but because of the low resolution of DV, plus the Cartoon Filter softens the detail, the shoe did not look very worn at all by the time the shot was finished. The client had me just cut the shot short.

Image 5 – Window Model
The Bedroom was another Lightwave model. For the “magic staff”, we placed a light in front of the actress that we turned on to simulate the glow of the magic once she raised the staff high enough. I placed a tracking marker on the end of the staff so I could track it and lock my “swirling magic” to it. The swirling magic was created in Particle Illusion. I rendered it out as a sequence and tracked it to the staff in After Effects. I also did some interactive lighting with the background as the magic appeared.
Organization –
Like I mentioned earlier, I had to have my video sequences comped together before I could create the graphic images for the
book. Several processes relied on other processes to be complete. So the hard part was figuring out the correct sequence of events so it all fit together!
book. Several processes relied on other processes to be complete. So the hard part was figuring out the correct sequence of events so it all fit together!
I have learned to be organized with my projects over the years, but this one took it to a whole new level. Because of all of the 3D elements, motion tracking, chroma keying and other time consuming pieces, I had to make sure my pipeline was very organized and flexible enough to handle any changes requested by the client. I used a lot of pre-comps so I could swap out animation and videos segments without destroying to overall main comp. Plus, I kept everything a segmented as possible so I could swap pieces out and/or re-time them in Premiere.
The 13th Princess was fun, but a LOT of work!
Behind the scenes shots –


